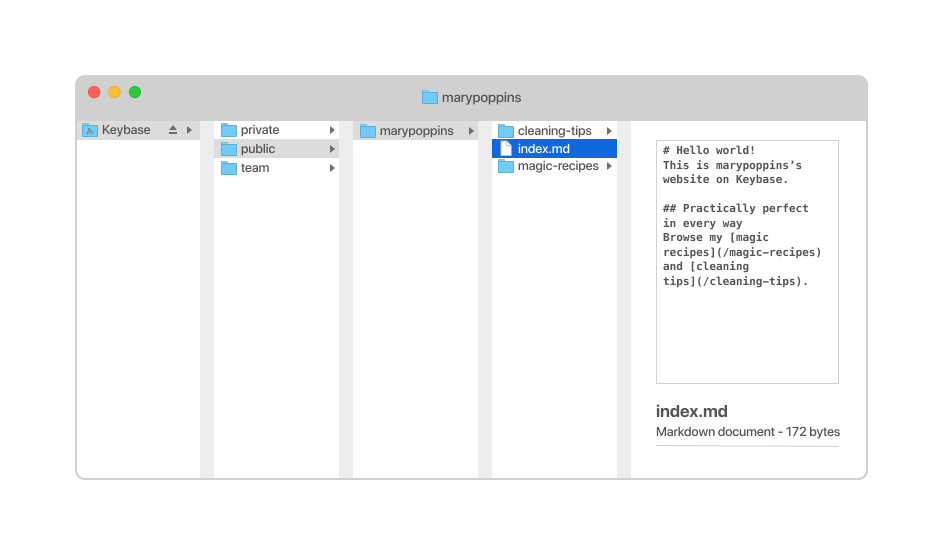
Keybase Sites
One perk of Keybase Files is that you can easily build and host a simple website in your public folder.
Getting started
To see how it works, type anything into a document. You can start with whatever you want, but it’s kind of a tradition to try out new things on the internet with this:
# Hello, world!
This example uses Markdown formatting (the # is a header). You can use HTML, too.
If you use Markdown, name your document index.md. If you use HTML, name your document index.html.
Drop this index file into your public folder. You’ll immediately see it on your home page at https://yourusername.keybase.pub/.
Adding pages
To add more pages:
- Create a new folder in your public folder. Name the folder with the page name.
- Add an index file with your content in it (remember, it’ll be public).
- Repeat this—create a new folder and add a new index file—for every new page.

Only index files, documents titled index.md or index.html, will show up on your website.
For example, let’s say that from your home page, you want to link to another page named foo. To do this, create a folder named foo in your public folder. Add an index file to the foo folder, with your content in it. This new page will appear at https://yourusername.keybase.pub/foo/.
Editing pages
To edit a page, open the index file, make your edits, and save it. Your changes will automatically update on your website.
Learn more
If you’re so inclined, you can see a couple examples and search for others’ websites at Keybase.pub.
Custom domains
You can also use a custom domain with Keybase Sites. This lets your website appear at any domain you own instead of at https://{username}.keybase.pub/.
Using kbpbot
kbpbot is a Keybase bot designed to help you publish your site using a custom domain.
For example, let’s say you’d like to publish your website at myname.com. To do so:
- In your private Keybase folder, create a new folder with the name
yourusername,kbpbot. Only you andkbpbotcan access, read, and edit files in this folder. - Within this folder, add another folder that will hold your site’s contents. Let’s name it
my-site. The complete folder name would be/keybase/private/person,kbpbot/my-site. - Drop any other files you’d like to publicly share on your website in this folder. You can use Markdown, HTML, CSS, and image files.
Team folders
Any Keybase folder that kbpbot can read works, so you can also use a team folder (e.g., /keybase/team/awesometeam/awesome-site) and add kbpbot as a reader.
DNS records
In order for your domain/hostname to point at the Keybase servers, you need to set up a CNAME record (you could also use an ALIAS record to forward an A/AAAA record) that points at the hostname kbp.keybaseapi.com. So, you’d have something like:
my-site.example.com. 300 IN CNAME kbp.keybaseapi.com.
Note that you can’t have CNAME on a root domain (e.g., example.com). Some DNS providers support it by making it a proxy for only A/AAAA records. This is sometimes called ALIAS. If you need to use a root domain with a Keybase Site, but your DNS provider doesn’t allow it, try switching to a different DNS provider.
In addition to the DNS record, kbpbot needs to know which shared folder you’d like to share on this hostname. You’ll need a TXT record for _keybase_pages as a subdomain of your hostname. In this case, that would be _keybase_pages.my-site.example.com. If the _keybase_pages prefix isn’t allowed, you may use _keybasepages.my-site.example.com as well.
The contents of this record are the prefix kbp=, and a full Keybase path to the folder you’d like to share, as created above. For this example setup, the record would look like this:
_keybase_pages.my-site.example.com. 300 IN TXT "kbp=/keybase/private/person,kbpbot/my-site"
This record tells kbpbot to look in this folder to share your files.
HTTPS security
Thanks to Let’s Encrypt, kbpbot is able to transparently request and install a HTTPS TLS/SSL certificate on your hosted domain name, for free.
If your configuration went smoothly, the contents of your folder are now shared over a secure HTTPS connection.
If you added a /keybase/private/person,kbpbot/my-site/index.html, that file will be made available at https://my-site.example.com/ (and also https://my-site.example.com/index.html).
If you shared an image at /keybase/private/person,kbpbot/my-site/puppy/gettingbig.jpg, that would be available at https://my-site.example.com/puppy/gettingbig.jpg, etc.
Git publishing
You can also publish your website through Git instead of Files.
Instead of sharing a folder with kbpbot, you can create a shared Keybase Git repository and publish that.
First, you need to be on a team with kbpbot:
- In Teams, select
Create a teamand give it a name. (We’ll call this onegitwithkbpbot, but it can be anything.) Add membersand invitekbpbotas a Reader. You can also addkbpbotto an existing team. Now you can create a Git repository to use for your new site.- In Git, select
New repositoryandNew team repository. Choose the team you share withkbpbot, and give the repository a name. (We’ll call this onegit-site.) - Clone the repository and add some content to it. Push to
master.
The DNS configuration for Git is a little different. The main CNAME/ALIAS record is the same (points at kbp.keybaseapi.com). But the TXT record needs to tell kbpbot about the Git repository instead of the filesystem location like before. It looks like this:
_keybase_pages.my-site.example.com. 300 IN TXT "kbp=git@keybase:team/gitwithkbpbot/git-site"
After the regular DNS propagation delays, the pushed contents of the master branch of your repository will be available at https://my-site.example.com.
More customizations
By default, directory listing is disabled when you host a custom domain with Keybase. You may enable listing by creating a .kbp_config file at the root of your site. This config file allows some simple customizations on different parts of the site, including enabling Cross-Origin Resource Sharing (CORS).
Learn more about .kbp_config.